Note from Authors: Make sure to download the Figma Prototypes with Microinteractions file to work along side these exercises!
Rachel Bennett Tweet
In the dynamic landscape of digital design, the power of microinteractions in enhancing user experience cannot be overstated. These small, functional animations and effects play a pivotal role in making digital interfaces more intuitive and engaging. As we delve into the world of Figma prototypes, understanding how to effectively incorporate microinteractions becomes essential for designers aiming to bring a layer of sophistication and interactivity to their projects. This guide is designed to introduce you to the concept of microinteractions within Figma, a leading interface design tool, and to provide you with the foundational knowledge to start implementing these subtle yet impactful design elements into your prototypes.
Microinteractions serve not only as a method to improve usability but also to inject personality into your designs. Whether it’s the feedback from a button press, the animation of a toggle switch, or the visual cues that guide users through their digital journey, these details contribute significantly to the overall user experience. By the end of this guide, you will have a clear understanding of how to create and refine microinteractions within your Figma prototypes. We’ll cover everything from the basics of identifying where microinteractions can be most effective, to the technical aspects of implementing them in Figma, ensuring that your designs not only look good but also feel responsive and alive.
Step 1: Make your prototypes Figma Prototypes more realistic
At a minimum, we expect a prototype to take us from point A to B, and so on. But if we want to take our designs to the next level, we should be thinking beyond defining A to B. We can make prototypes more realistic using Figma’s built in prototyping capabilities, we can take a prototype from just okay to WOW.
Take this Spotify redesign by Soroush Norozy for instance. The designs might look great, and maybe they would result in a better user experience. But without interactions, they just don’t feel real.

Adding to the excitement of a well-designed prototype is the ability to showcase it effectively. This is where the power of storytelling comes into play. By crafting a compelling narrative around your prototype, you can engage your audience and help them understand the value of your design.
One way to enhance your storytelling is by using personas in your presentation. These fictional characters, who represent your target users, can provide context and show how the prototype addresses their needs, pain points, and goals. By putting a human face on your design, you can make it more relatable and appealing to your audience.
As designers, we want to deliver concepts that are as close to the real thing as they can be, whether our audience is engineers, project managers, clients, or shareholders. In this guide, we’re going to use this file to demonstrate some techniques to help you make your prototypes more realistic.
Horizontal and Vertical scrolling
Whenever we’re interacting with an app, it’s logical that we’re craving a sense of direction and control, creating a very organic navigation and intuitive process. Remember that as designers, we have to make the path to their desired goal feel obvious to the user. Some examples of this principle might include: having a clear call to action button, allowing content to “fade out” as it reaches the edge of the screen view in a way that invites the user to scroll, and having consistent patterns for navigation that appear throughout the product.
Moreover, some layouts may require both horizontal and vertical scrolling. In order to learn how to incorporate this technique into your designs, continue reading.
Prototype Microinteractions: For Horizontal Scrolling
1. Make sure your selection has an auto layout to give each element a designated space
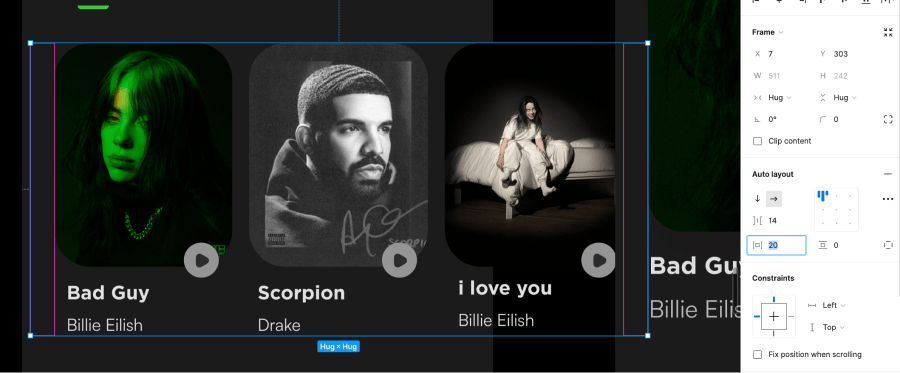
2. Once the selection is in the frame, resize it and drag it to fit the size of the overflow contents that will need to scroll.

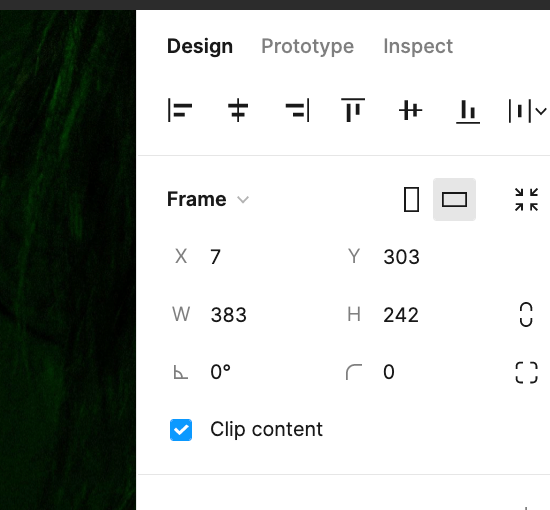
3. Click on clip content, and switch to the prototype tab.
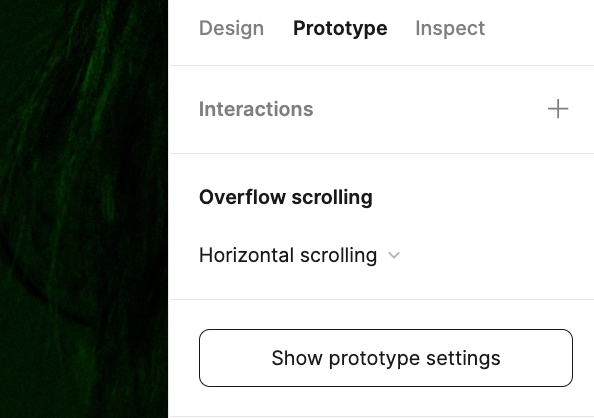
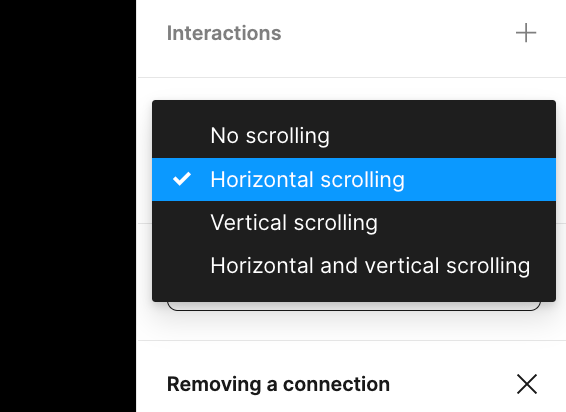
4. Set to horizontal scrolling.
5. Press play to test the interaction in your prototype.

Prototype Microinteractions: For Vertical Scrolling
1. Set your content into a fixed position while scrolling, available on the design tab in Figma.

a. Make sure your selection has auto layout to give each element a designated space.
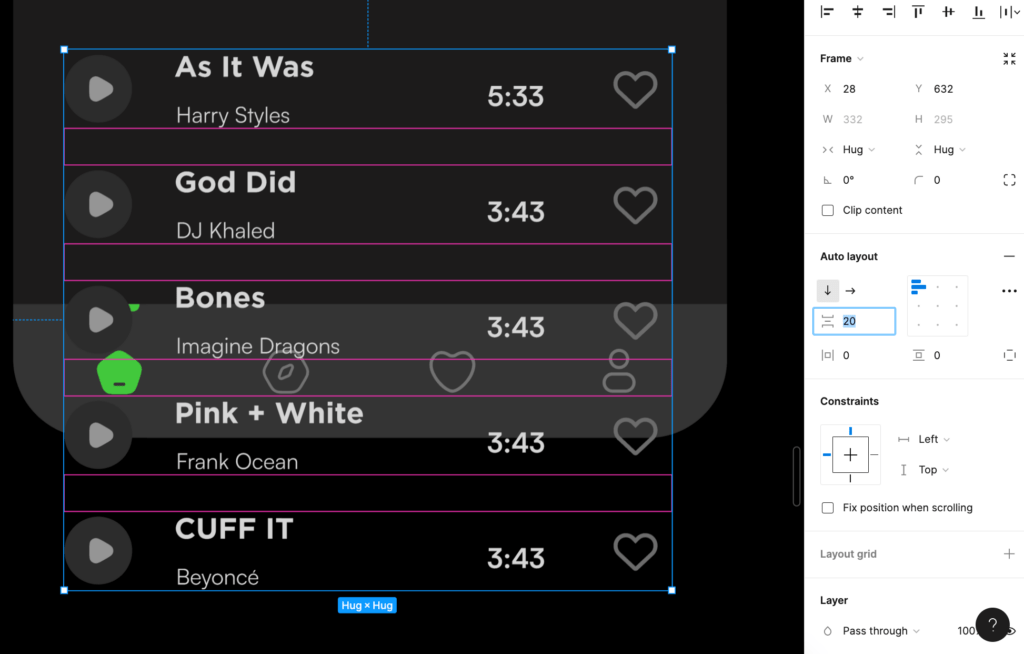
2. Once your selection is within the frame, resize it and drag it to fit the size in which you’d like to have your elements available to sight.
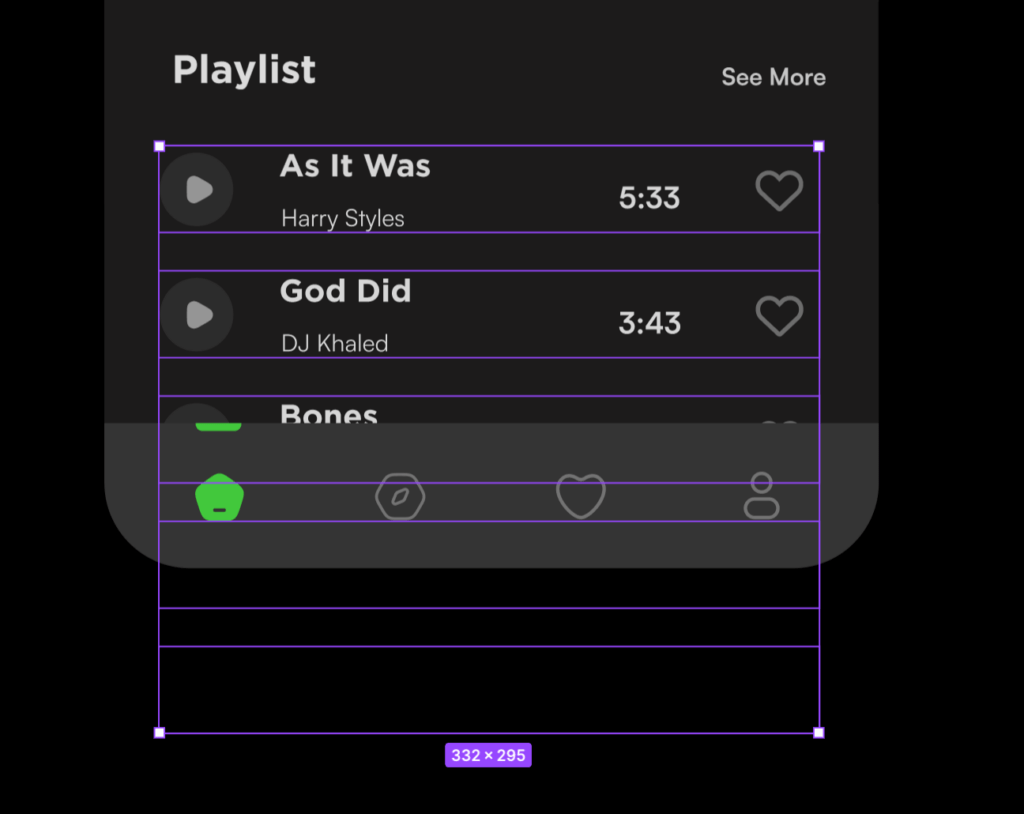
3. Click on home screen frame, and change overflow scrolling to vertical scrolling
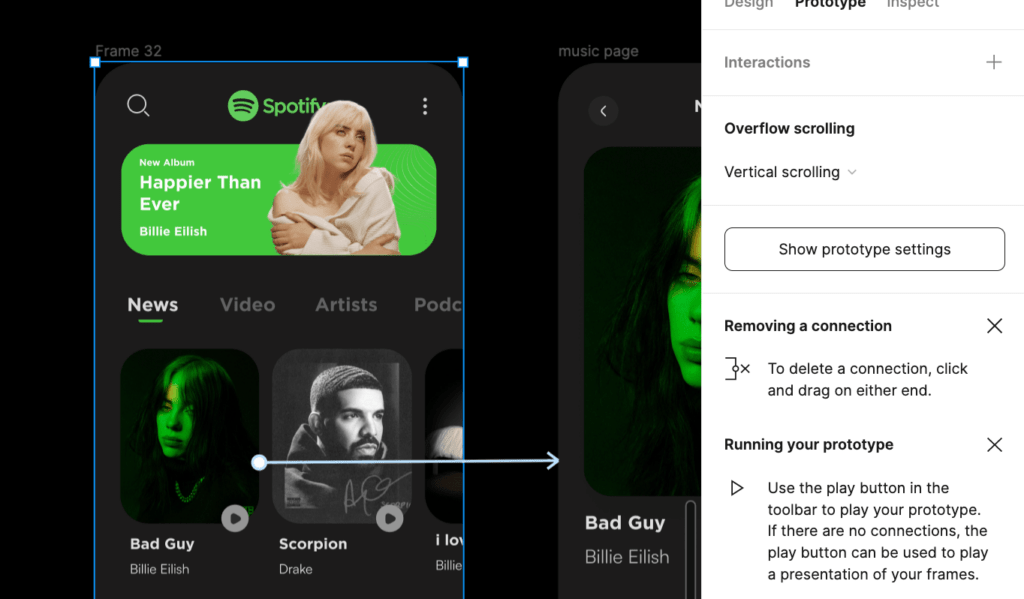
a. Press play to test the interaction in your prototype.

Now you can maximize the real estate on your page for designs with more complex layouts. Next up, let’s take a look at how you can add micro-interactions to your prototype.
If you want to know more about how to add vertical and horizontal scrolling, you can do it here.
Enhancing Figma Prototypes with Microinteractions
The key to creating a successful interactive experience is to keep it simple. In the real world, we are constantly interacting with and responding to stimuli both consciously and unconsciously. More and more, our digital world is beginning to mimic that experience. But how can a flat screen interact with a human user? The answer is microinteractions. Interactions provide us with instant feedback, reducing the amount of guesswork and allowing us to make each decision that much easier. Taken at scale, interactions play a huge part in making or breaking our experience with any digital product.
Let’s take a look at an example of a microinteraction. In this design, the heart icon changes color and animates as the user taps it.
Follow these steps to learn how to incorporate this technique into your own prototype:
1. Create or retrieve your heart icon + Insert it within your file
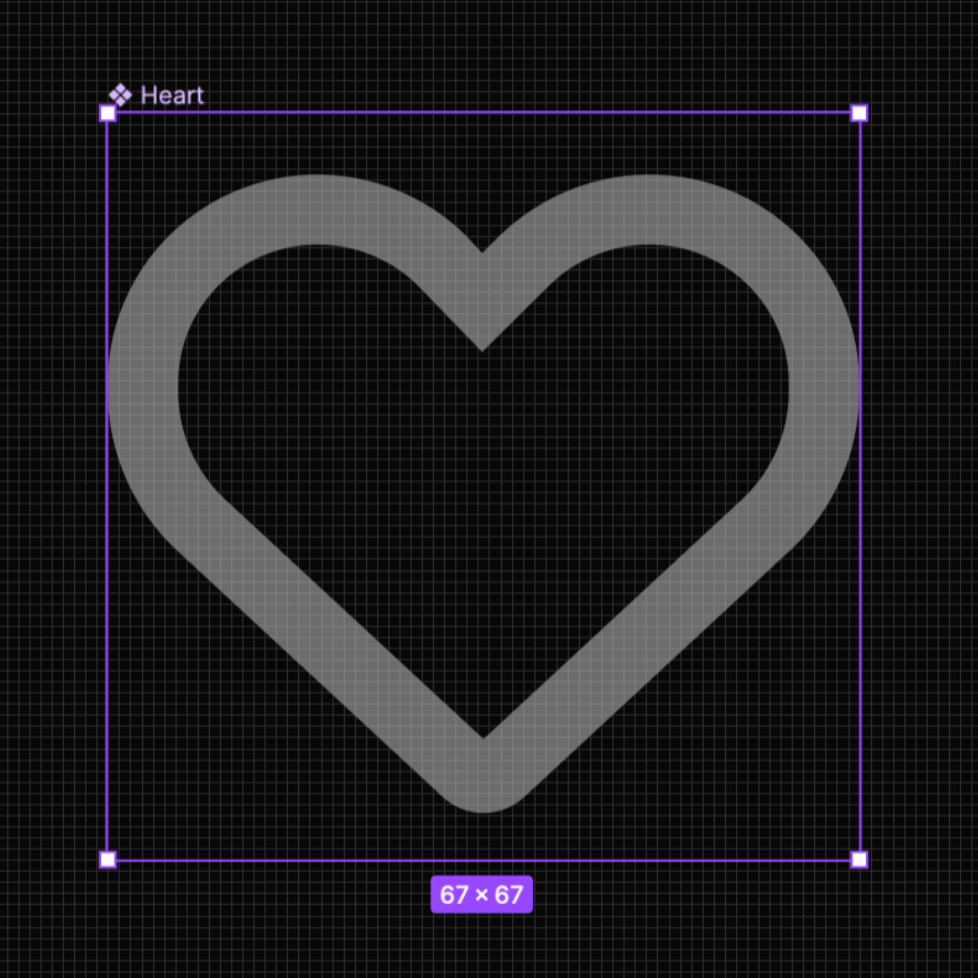
2. Duplicate your heart icon with its variants, and create your component variant set.
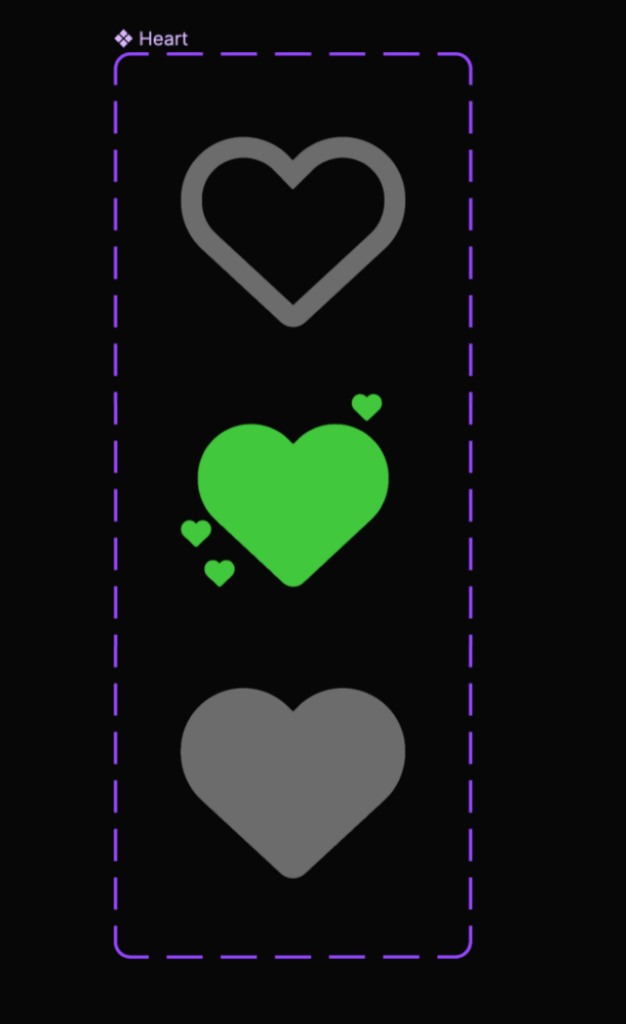
a. Set up your interactions.
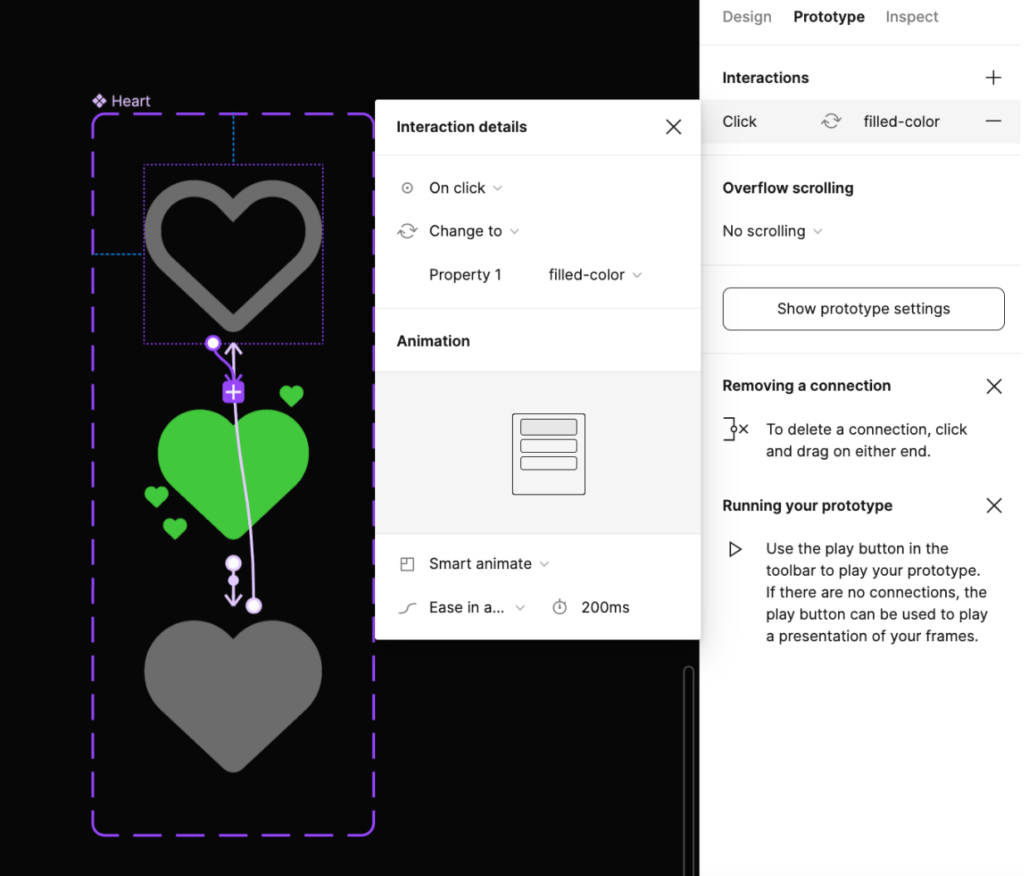
3. When you’re done, close the loop by connecting your prototype link back to the start of your flow.
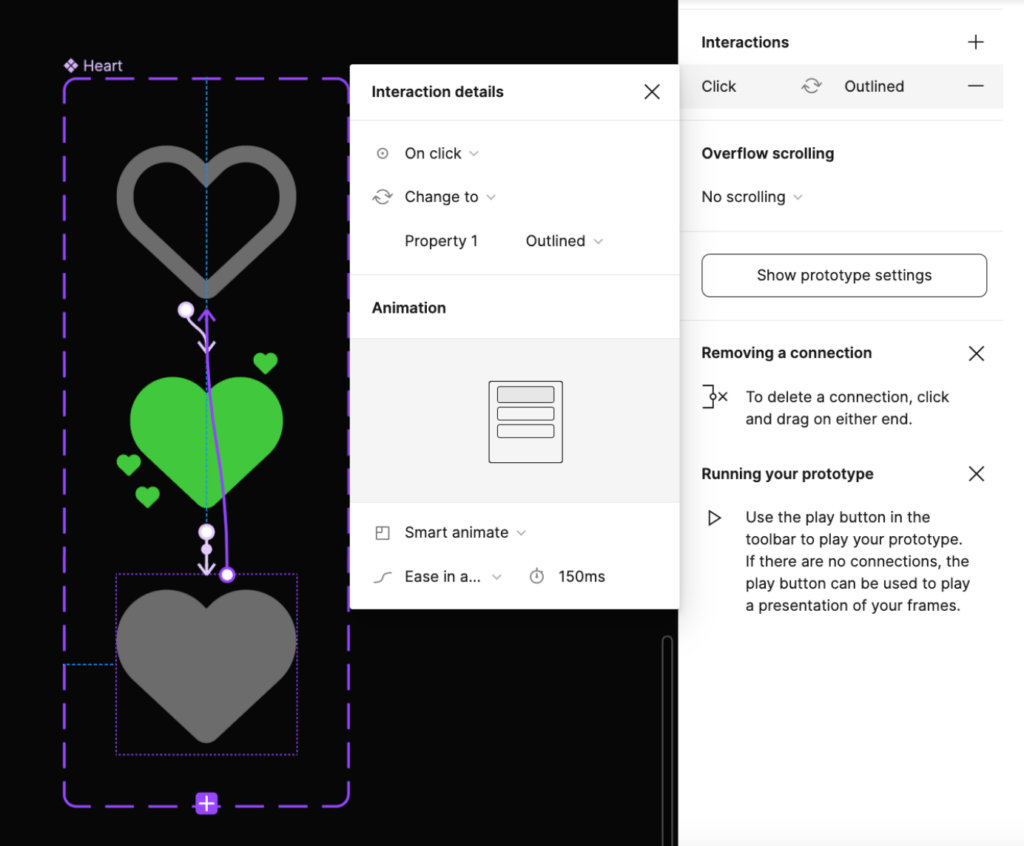
4. Preview your prototype!

Enhancing your Figma Prototypes with Microinteractions can greatly improve the interactive experience of any digital product. By simplifying the user interface and providing instant feedback, microinteractions can help users make decisions more easily and create a sense of accomplishment. In the next chapter of this guide, we’ll show you how to implement overlays to prototype screens and create a seamless flow of content. Be sure to continue reading to learn more practical tips and techniques for designing engaging interactive experiences.
Implementing Overlays to Your Screens
Implementing Overlays to Your Screens can create the effect of opening up an element or screen. Consider using overlays to introduce content instead of navigating the user to another screen.
Implementing overlays to your screens is a great way to connect your product’s flow. This creates a dynamic flow that can even contribute to your organic storytelling within your app. You can accomplish this technique by setting the interactions on determined actions that the user should accomplish, such as tapping or dragging particular objects, groups, frames, etc. Remember that your overlay must be inside your frame to properly display the interaction.
Incorporating overlays is not only an excellent way to improve your app’s user experience, but it also helps reduce the cognitive load on users by simplifying the navigation process. By keeping users focused on their current screen and introducing new content seamlessly, you can create a more intuitive and enjoyable experience for your users.
Another benefit of using overlays in your design is the ability to provide contextual information or functionality without disrupting the user’s flow. Overlays can be used to display tooltips, forms, or even multimedia content, such as images or videos. This allows users to quickly access important information or complete a task without navigating away from their current context.
We hope that this chapter has provided you with valuable insights into creating effective interactions using overlays on your Figma Prototypes with Microinteractions. If you’re looking to further Increase Interactivity with Videos and create immersive experiences for your audience, be sure to keep reading the next chapter of the guide.
Increase Interactivity with Videos
Many social media apps today include video integrations for different types of content. Using this tool wisely can contribute to a more immersive experience for your audience. In this section we’ll show you how to Increase Interactivity with Videos and incorporate it into your designs.
Take a look at the steps to add video into your Figma Prototype with Microinteractions:
1. Create your component set with both image and video available

2. To add video to your Figma file, simply create the shape you need, click the color filler, and select Video from the drop-down menu.
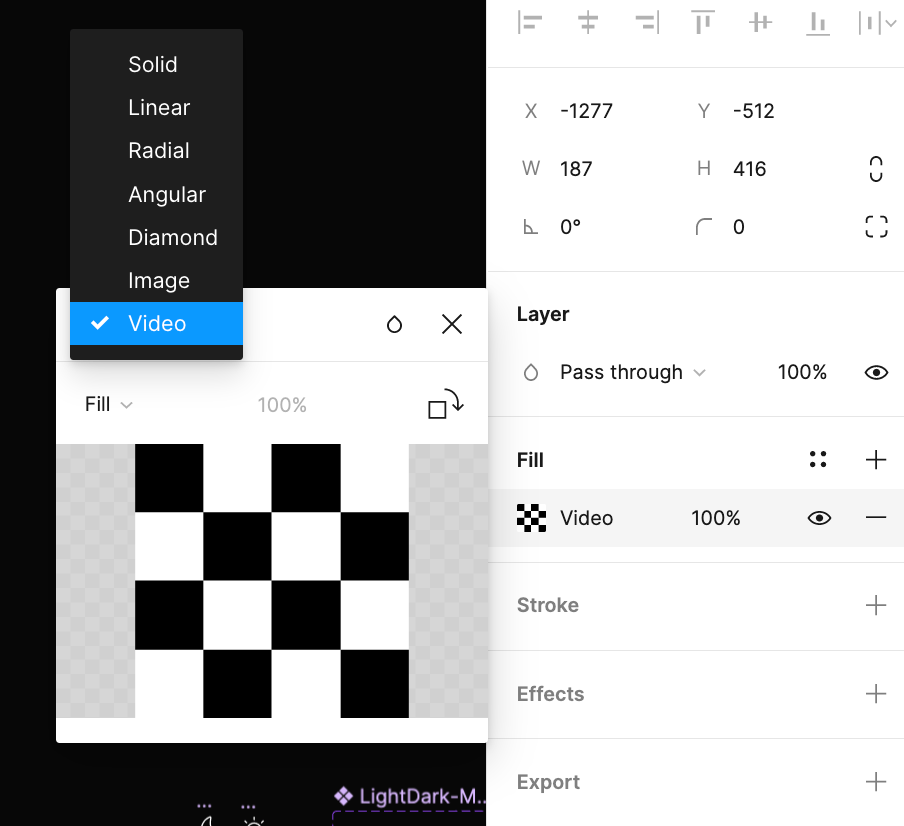
3. Add the interaction details, keeping in mind to close your interaction loop to allow the user to exit the video.
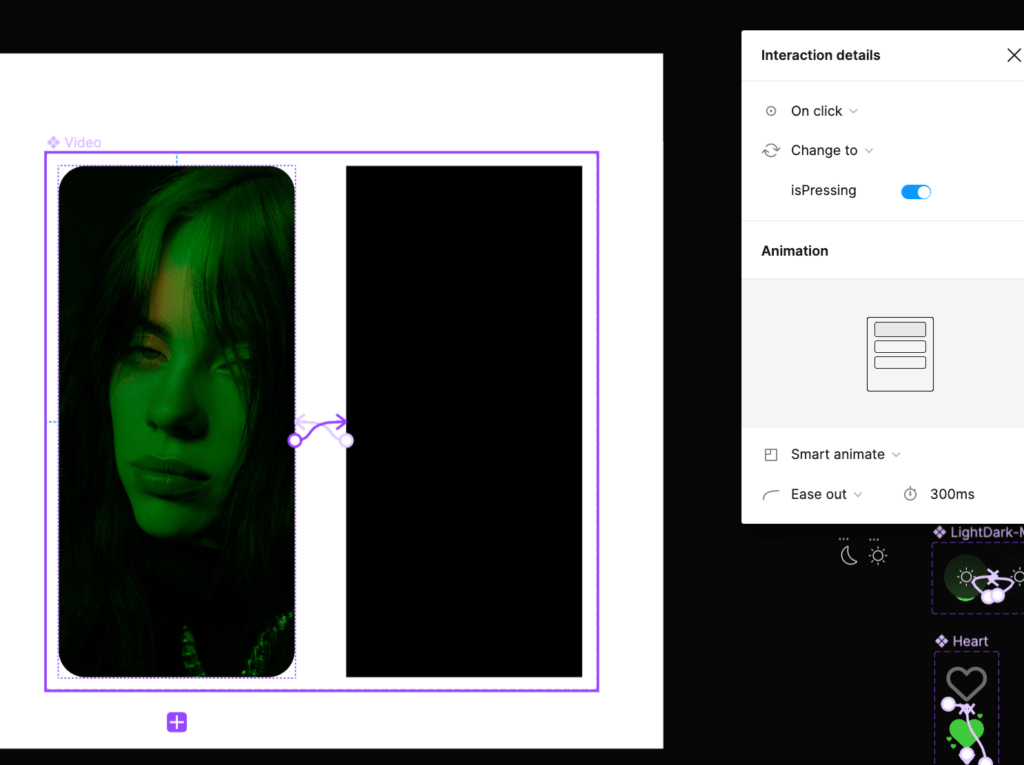
4. Place your component in the desired spot you’d like the interaction to take place, and play your prototype!
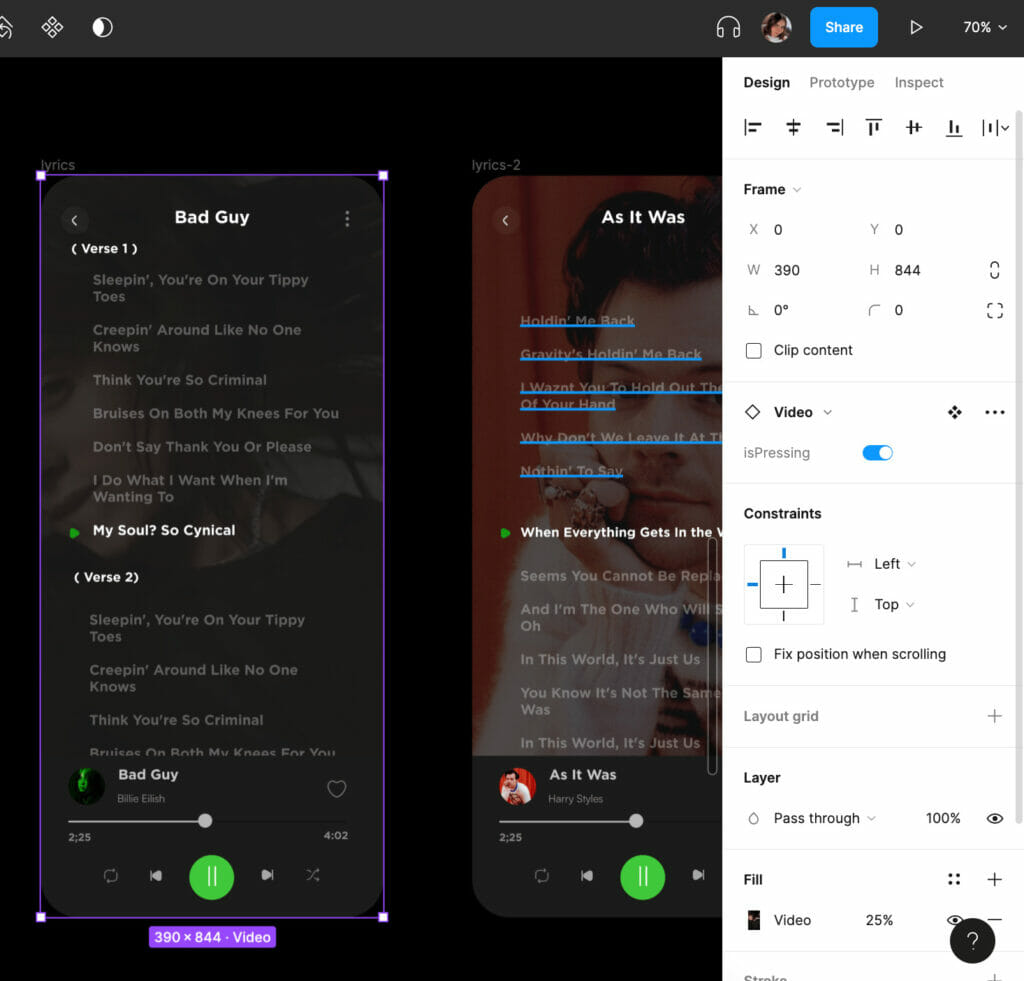
Recap of this chapter
In this chapter, we have shown you how to Increase Interactivity with Videos by providing step-by-step instructions on adding video to your Figma Prototype file with Microinteractions. You can create engaging designs that will captivate your audience by following these simple steps and keeping your interaction details in mind. However, creating interactive experiences involves more than just adding videos. The next chapters of the guide will provide practical advice on how to document interactions during the hand-off phase and explore other ways to make your designs more interactive. Stay tuned for more insights on designing immersive experiences.
Hand-off phase
Communicating your visual requirements early and often with your teammates and other relevant parties is one of the most essential parts of a designer’s job.
In the Hand-off phase, clear communication is crucial to ensure a successful product launch. Communicating your visual requirements early and often with your teammates and other relevant parties is one of the most essential parts of a designer’s job. This is especially important in this phase. In this chapter, we’re going to go over some best practices for handoff as they relate to prototyping interactions.
Help your development team read your file better
Figma makes it easy for developers to review front end styling and basic CSS for your designs – just share your prototype with the necessary team members with their permissions set to view, and they will be able to see details for each page in inspect mode.
Video demonstrating how developers can be able to access the CSS code for your designs by going on the Inspect mode tab
This certainly helps to cover the basics of your design specifications, but what about when it comes to documenting interactions? To define the steps of an interaction more clearly, you might consider providing your developers with an interaction guide. This will serve to outline the key states of your interaction, and will help the development team to clearly understand how it should be set up. Here is an example of how an interaction guide could look, using one of the examples we outlined previously:
Document Motion Studies
Instead of showing off static images or brief descriptions of how you visualize the interaction of your product, create actual prototypes that indicate the exact motion whenever they would be prompted. Document the direction a flow would take, how a particular button would respond to a tap, and all the relevant information about how you expect the elements to interact together.
Full walkthrough demonstration of the product with all interactions already in motion
A motion study doesn’t have to be too detailed, as long as it’s playable and clickable, it’s a good start for developers to review part of the work that they’d need to lay out when working on the back-end.
Interaction Guide
Through this particular visual, your team is able to review the outlined positions, rotations, scale, and timing of the elements. This can be able to include labels that indicate each specific requirement.
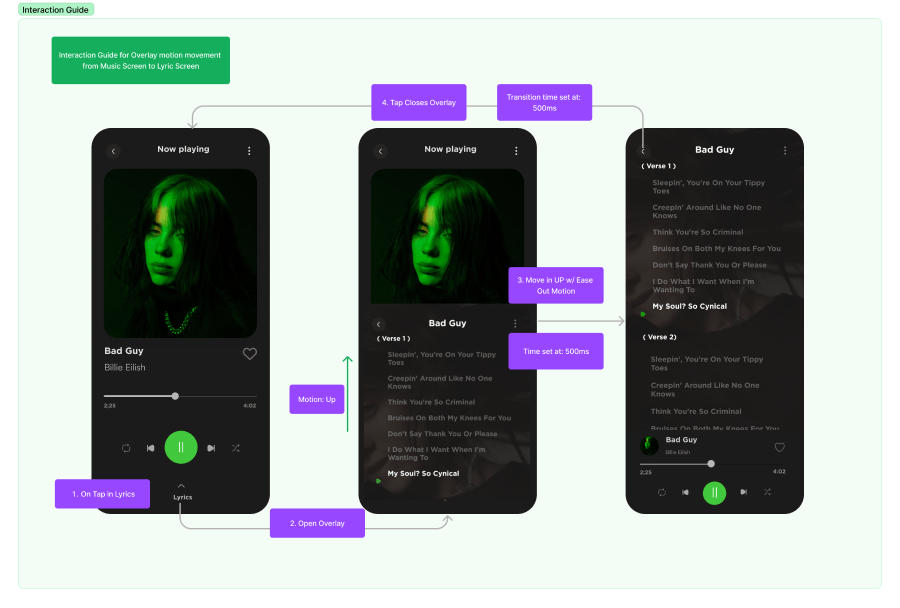
Utilizing this method can help you as a designer to be more thoughtful on the complexity of the requirements you’re setting on your design and, during the hand-off phase, your development team will thank you for outlining your requirements clearly.
Communicate your ideas for interactions
Last but not least, making sure both designers and developers are on the same page is key. Communicate your ideas for interactions, animations, and user experience at all stages of the design process to ensure the plan is clear and able to be executed. Make sure you’re getting the most out of Figma by incorporating these techniques into your work.
In order to foster a strong collaboration between designers and developers, it’s essential to establish a shared language and understanding of the project’s goals. One way to achieve this is by creating comprehensive design documentation that outlines the rationale behind your design decisions, as well as any technical requirements or constraints. This will help bridge any gaps in knowledge and ensure everyone is working towards the same vision.
Remember that the most important aspect of effective collaboration is to maintain open lines of communication throughout the project. Schedule regular check-ins and feedback sessions to discuss progress, address any concerns, and share new ideas. By keeping everyone informed and involved, you can avoid misunderstandings and ensure a smoother design process.
Finally, to further enhance the quality of your prototypes, consider incorporating user testing and feedback into your design process. By gathering insights from real users, you can identify areas for improvement and make informed decisions about how to optimize your designs for the best possible user experience. This iterative approach will not only result in more polished and effective prototypes, but it will also help you develop a deeper understanding of your target audience’s needs and preferences.
By now, you will be able to use the case study provided above as a great practice to push your Figma Prototypes with Microinteractions to a whole new level! What are some ideas you’ve had to enhance the user experience of your designs and communicate your ideas for interactions? We’d love to hear from you!
Best of Luck,
The OpenForge Team

